Software Development

Becoming a better Data Scientist and Programmer

You have just learnt the basics of a programming language at school or college or through an online course. You now know the basic components of a program. You are also able to solve some basic problems using small amounts of code.

But somehow when you are writing pieces of codes in professional capacity, you are always making multiple changes in your code and are constantly discussing things over long meetings. Maybe you are not as good a programmer as you thought you were?

I was faced with an exactly the same kind of problem a couple of years back, when I started my career as a software developer working on large code bases and developing pieces of software that would run in production and impact thousands of systems. Fortunately for me, I had the support of extremely patient peers and colleagues who were kind enough to spend some of their valuable time guiding me. These were people who had almost 15 to 20 years of experience writing programs that were efficient, easy to debug and easy to modify in face of frequent changes in requirements.

In this post I will list a few resources that were recommended by these seasoned programmers and why every programmer should have a look at them as well. Going through these resources surely changed the way I approached the problems and made me realize the immense knowledge that is still to be gained.

Here are some of the recommended readings for anyone who wants to program for a living:

  1. The Pragmatic Programmer by Andrew Hunt and David Thomas
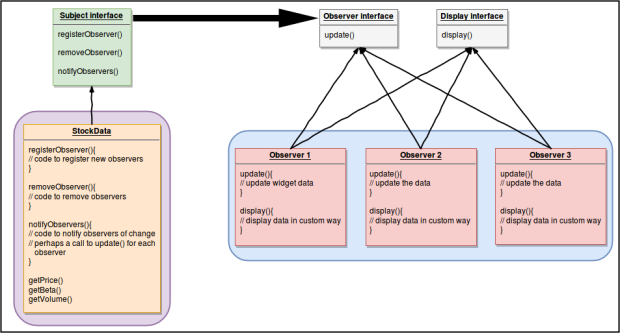
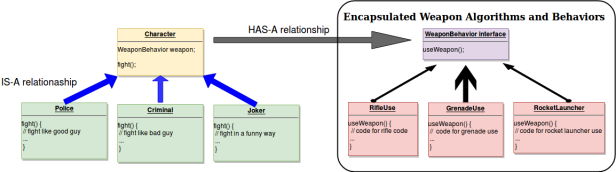
  2. Head First Design Patterns by Eric Freeman and Elisabeth Robson
  3. Structure and Interpretation of Computer Programs by Gerald Jay Sussman and Hal Abelson
  4. Introduction to Algorithms by Cormen, Leiserson, Rivest and Stein
  5. Modern C++ Programming with Test-Driven Development by Jeff Langr

If you are also working with developing analytics solutions, using machine learning in your work and are looking to get a better understanding of the various algorithms that you are working with, then you should also have a look at these books:

  1. Machine Learning by Tom Mitchell – A good introduction to the basic concepts of Machine Learning. Best when studied in parallel to following the Machine Learning course by Andrew Ng. Recommended for beginners to advanced level learners.
  2. An Introduction to Statistical Learning by Gareth JamesDaniela WittenTrevor Hastie and Robert Tibshirani – A good introduction for anyone entering at a beginner/junior level as a Data Analyst or a Data Scientist. Provides really good introduction to the basic machine learning concepts as well as their code in R language. Recommended for beginner to medium level learners.
  3. The Elements of Statistical Learning by Jerome H. Friedman, Robert Tibshirani, and Trevor Hastie – A really great book for understanding the concepts of machine learning and understanding the mathematical and statistical properties behind them. Recommended for medium to advanced level learners.
  4. Deep Learning by Ian Goodfellow,‎ Yoshua Bengio and Aaron Courville – A comprehensive collection of various aspects of deep learning. Includes introduction to Linear Algebra and Statistics followed by the present deep learning research and the future work in the area. Can be read by beginner to advanced level learners.
  5. Data Science for Business by Foster Provost and Tom Fawcett – A great read for anyone at any level. It helps you really understand some aspects of the Data Science field which might not be very intuitive for a  beginner or someone coming in from a purely computer science background.
  6. Modeling the Internet and the Web bPierre BaldiPaolo Frasconi and Padhraic Smyth

The second list of books are not for light reading and require a sufficient amount of devotion. I am still reading some of them even after 2 years and going back to them multiple times for better understanding. However, they are all worth your time and will definitely reward you over the next couple of years as we work on more complex problems and design more sophisticated systems.

Good luck on your journey to becoming a better programmer 🙂


Self Driving Vehicles: Traffic Light Detection and Classification with TensorFlow Object Detection API

With the recent launch of the self driving cars and trucks, the field of autonomous navigation has never been more exciting. What were once research projects in laboratories are now commercially available products. One of the main tasks that any such vehicle must perform well is the task of following the rules of the road. Identifying the traffic lights in the midst of everything is the one of the most important tasks. Thankfully due to the recent advancements in Deep Learning and the ease of use of different Deep Learning Frameworks like Caffe and TensorFlow that can utilize the immense power of GPUs to speed up the computations, this task has become really simple. In this article I will show how anyone can train their own model for the purposes of Traffic Light Detection and Classification using the openly available data-sets and tools. I used the Udacity’s openly available data-sets. Udacity’s Self Driving Car Engineer Nanodegree provides a simulator and some ROS bag files. The model that I have developed was a part of the final capstone project submission in which we need to first pass the tests on the simulator and then pass the test by driving around an actual track on a real vehicle.


Step 1: Gather the data

As with any machine learning exercise, we first need to gather our data on which we will train the model. The simulator images look something like this:

Data the simulator’s camera captures

While the actual images from the track look something like this:

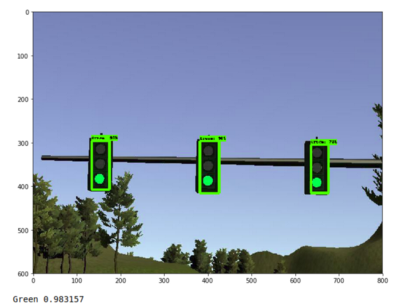
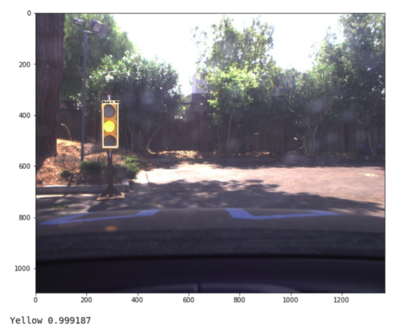
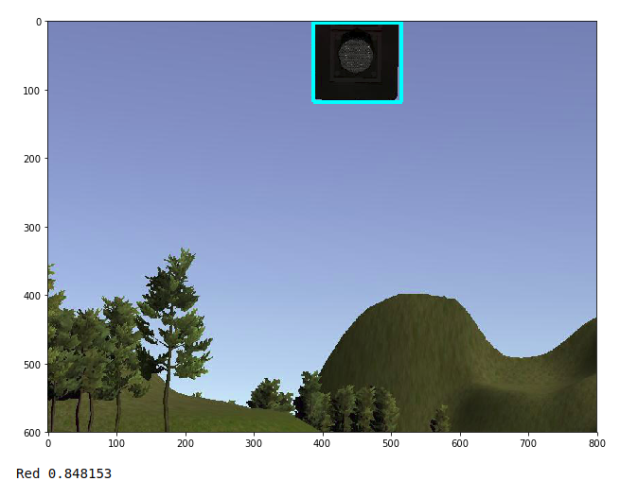
Data the real car’s camera captured from the track

Step 2: Label and annotate the images

The next step is to manually annotate the images for the network. There are many open source tools available for this like LabelImgSloth, etc. The annotation tools create a yaml file that looks something like this:

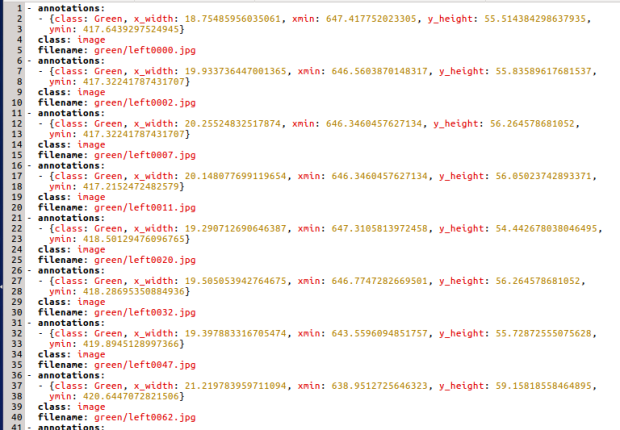
Output after manual image annotations

This step was the most time consuming of all. When I started, it took me almost 3 hours to understand the working of the tools, install the dependencies and then annotate the simulator data-set. Luckily, one of the main advantages of the Nano-degree is the immense amount of support that you get from discussion with your peers from around the world. One of my peers, Anthony Sarkis has graciously made his annotated data-set openly available for all to use. Thank you Anthony Sarkis for this 🙂


Step 3: Training the Model

For training the model with the API, we first need to convert our data into the TFRecord format. This format basically takes your images and the yaml file of annotations and combines them into one that can be given as input for training. The starter code is provided on the tensorflow’s Github page.

Next we need to setup an object detection pipeline. TensorFlow team also provides sample config files on their repo. For my training, I used two models, ssd_inception_v2_coco and faster_rcnn_resnet101_coco. These models can be downloaded from here.

I needed to adjust the num_classes to 4 and also set the path (PATH_TO_BE_CONFIGURED) for the model checkpoint, the train and test data files as well as the label map. I also reduced the number of region proposals from the author’s original suggestion of 300, to 10 for faster_rcnn and from 100 to 50 for ssd_inception. In terms of other configurations like the learning rate, batch size and many more, I used their default settings. (Note: the second_stage_batch_size must be less than or equal to the max_total_detections so I reduced that to 10 as well for faster_rcnn else it will throw an error.)

Note: The data_augmentation_option is very interesting if your dataset doesn’t have much of variability like different scale, pose etc. A full list of options can be found here (see PREPROCESSING_FUNCTION_MAP).

We also need to create a label map for each class. Example of how to create label maps can be found here. For my case it looked something like this:

label_map

So in the end, we need the following things before going to the next step:

  1. COCO pre-trained network models
  2. The TFRecord files we created earlier
  3. The label_map file with our classes
  4. The image data-set
  5. The TensorFlow model API

Next steps are pretty straightforward. You need access to a GPU for training. I used the AWS p2.xlarge with the udacity-carnd-advanced-deep-learning AMI which has all the dependencies like TensorFlow and Anaconda installed. I trained in total 4 different models — two models with faster-rcnn (one each for simulator images and real images) and two with ssd_inception.

The output of the model inference looks something like this:

Detection on the simulator images
Detection on the real images

The detection and classifications were really good with both the models, though the ssd_inception trained model made a few minor errors like the one in the below image which was correctly classified by the faster_rcnn model.

Wrong Classification by SSD Inception model

However, the plus point of the ssd_incpetion model was that it ran almost 3 times faster than the faster_rcnn model on simulator and almost 5–6 times faster on the real images.

You can see my code and the results on my GitHub repository. It also contains the link to the data-sets and the annotations.

Good luck with your own models 🙂

Random Forest – The Evergreen Classifier

DisclaimerSome of the terms used in this article may seem too advanced for an absolute novice in the fields of machine learning or statistic. I have tried to include supplementary resources as links which can be used for better understanding. All in all I hope that this article motivates you to try solving a problem of your own with random forest.

In the last few weeks I have been working on some classification problems involving multiple classes. My first approach after cleaning the data-set and pre-processing it for categorical outputs was to go with the simplest classification algorithm that I knew – Logistic Regression. The logistic regression is a very simple classifier that uses the sigmoid function output to classify the labels. It is very well suited to a binary classification problem in which there are only two possible outcomes. However, it can also be tweaked to classify multiple classes by using one-vs-one or one-vs-all approaches. Similar approaches can be taken with Support Vector Machine as well. The accuracy I got was around 88% in the training set and about 89% on my cross-validation set after a few hours of parameter tuning. This was good but as I researched more, I came across Decision Trees and their bootstrapped aggregated version, Random Forest. A few minutes into the algorithm’s documentation (by the person who coined the term bagging, Prof Breiman), I was amazed by its robustness and functionality. It was like an all in one algorithm for Classification, Regression, Clustering and even filling the missing values in the data-set. No other machine learning algorithm caught my attention as much as it did. In this article I would try to explain the working of the algorithm and its features which make it an evergreen algorithm.

A random forest works by creating multiple classification trees. Each tree is grown as follows:

  1. If the number of cases in the training set is N, sample N cases at random – but with replacement, from the original data. This sample will be the training set for growing the tree.
  2. If there are M input variables, a number m<<M is specified such that at each node, m variables are selected at random out of the M and the best split on these m is used to split the node. The value of m is held constant during the forest growing.
  3. Each tree is grown to the largest extent possible. There is no pruning.

To classify a new object from an input vector, put the input vector down each of the trees in the forest. Each tree gives a classification, and we say the tree “votes” for that class. The forest chooses the classification having the most votes (over all the trees in the forest).

One of the great features of this is that it eliminates the need for a cross-validation set, since each tree is constructed using a different bootstrap sample from the original data. About one-third of the cases are left out of the bootstrap sample and not used in the construction of the kth tree.

The algorithm also gives you an idea about the importance of various features in the data-set. As this article mentions, “In every tree grown in the forest, put down the out-of-bag cases and count the number of votes cast for the correct class. Now randomly permute the values of variable m in the out-of-bag cases and put these cases down the tree. Subtract the number of votes for the correct class in the variable-m-permuted out-of-bag data from the number of votes for the correct class in the untouched out-of-bag data. The average of this number over all trees in the forest is the raw importance score for variable m.”

Do check out the page by Berkeley to get more idea about the great points about the algorithm like:

  • Outlier Detection
  • Proximity Measure
  • Missing Value replacement for training and test sets
  • Scaling
  • Modelling for quantitative outputs, etc and more

But, one thing is undisputed, Random forest is among the most powerful algorithms that are out there for classification, and there are off the shelf versions that can be used for many typical problems.

As a last note, do check out the photo-gallery of Prof. Breiman to get a more idea about his life and his work. I could not help but feel motivated after going through his work.

Design Patterns #2 – Observer Pattern

In the last design patterns post we looked at the strategy pattern and how it is a good idea to decouple your constantly changing code from the rest of your application. In this post we will look at another amazing design pattern called the Observer Pattern.

According to sourcemaking.com, the Observer Pattern “Define a one-to-many dependency between objects so that when one object changes state, all its dependents are notified and updated automatically.”. This pattern is can be understood by looking at a real-life analogy.

Consider a newspaper or a magazine subscription. The publisher starts a business and begins to publish the newspapers and magazines. You, your friends and family subscribe to a particular publisher, and every time there is a new edition, it gets delivered to you and all the other subscribers. As long as you are subscribed, you get all the new and exciting news and magazines. You unsubscribe anytime you feel like you don’t want the newspapers anymore and the delivery stops. So while the publisher remains in business, people, businesses, hotels, airlines, etc. constantly subscribe and unsubscribe to the newspapers and magazines. This is in essence the entire Observer Pattern.

This pattern forms an important part of the Model-View-Controller architecture. You can read more about the MVC on wikipedia and here. The main idea is that there is a central model and multiple views, which are separated, and the changes made to the model must be reflected automatically in each of the views.

Now let us look at how we will implement this pattern. Imagine you have an object that is the source of the news or new information. This object is called the Subject in the technical parlance. The listeners or subscribers to the Subject are called the Observers (no surprises here!). Suppose we want to develop an application that uses an external API to read the stock prices and then updates some widgets on our system. The widgets might display the current stock price, the beta value and the volume. We will have a Subject interface which will provide methods for registering observers, removing observers and notifying observers of the changes. Our concrete Subject class will extend these interfaces and implement these methods apart from having some custom methods to get the data from the API. We will have an Observer interface that will specify an update() method and some other methods for displaying the data. Now all our widgets will be a concrete implementation of this Observer interface and implement both the update() and display() methods in their own ways. But the key point is that as soon as the Subject gets an update from the API that there has been a change in the value, it will call the method to notify the observers (notifyObservers()). This method can call the update() method for each observer in its observer list and pass the new data to it. This way all the observers will simultaneously receive the updated data.

The diagram below should make it clearer.

ObserverPattern

Java provides you with an Observable class, which simplifies a lot of it for you. The main difference being that every time there is a change, the concrete subject (StockData class) will first call the setChanged() and then the notifyObservers() method and pass the new value as its argument. The update() method in the observers will get this new value instantly. Be careful though, the Observable in Java is a class and not an interface. This can lead to some issues like you cannot add the observable behavior to an existing class that already extends another superclass. Also you cannot create your own implementation that plays well with the Java’s built in Observer API. You also cannot call the setChanged() method as it is a protected method which means you must first subclass Observable.

Use your best judgment to best determine which way to implement this pattern for your applications. I hope you learned something new and interesting in this post.

Stay tuned for more 🙂

Design Patterns #1 – Strategy Pattern

In the past two years, as I delved deeper into the world of software development and maintenance, I realized that there is a thin line that separates a maintainable code and a messy one. This thin line can save you hundreds of hours in new releases, development and maintenance. This thin line is between those who are familiar with and follow the design patterns and those who don’t. Now honestly speaking, I am ashamed that this is not one of those things that are taught in the undergraduate curriculum for Computer Science. It definitely deserves a mention after students are familiar with the concepts of Object Oriented Programming (OOP). This is because in real world, more time is spent in maintaining and changing software than on initial development. This is why there should be a significant effort towards code reuse and extensibility as well as maintainability.

Design Patterns help developers create functional, elegant, reusable and flexible software[Head First Design Patterns]. Patterns help you in getting to the final product faster by avoiding a lot of common issues that other developers might have faced by providing general solutions to those common problems. Patterns help you in using your basic OOP knowledge and take it one level up to build good systems.

According to sourcemaking.com, “In software engineering, a design pattern is a general repeatable solution to a commonly occurring problem in software design. A design pattern isn’t a finished design that can be transformed directly into code. It is a description or template for how to solve a problem that can be used in many different situations.”

Now let us look at our first design patterns – Strategy Pattern.

According to Head First Design Patterns, “The strategy pattern defines a family of algorithms, encapsulates each one, and makes them interchangeable. Strategy lets the algorithm vary independently from clients that use it.”

Now lets translate this definition into simpler terms. What strategy pattern advises is to separate parts of the code that change from those that stay the same. It advises to put different behaviors in different interfaces and then implement each separate behavior through its own class. Let us look at an example now.

Suppose you are developing a game like Counter Strike. Now each character of the game can make use of one weapon at a time, but can change weapons at any time during the game. There are also multiple types of players with different outfits. One way to implement this could be to simply have a Soldier class and all the characters inherit from this. Now if tomorrow, you want to add a dummy soldier who does not have the capabilities to shoot or run,  then you will have to rewrite a lot of classes. Also if every six months you want to add new characters with different capabilities, then inheritance is not a very good way to go.

One way this problem can be solved is by separating the characters and their behaviors. You can have a Character class and all your soldiers can inherit from this. You can have a WeaponBehavior interface that specifies how to use the weapon with a useWeapon() method. Now your Character class can have an instance variable that is declared as the interface WeaponBehavior type. Each different weapon like a gun, a knife, a grenade, a smoke bomb, a rifle, etc. can implement the useWeapon() method of the WeaponBehavior interface in its own unique way. In this way, if tomorrow you want to add a new weapon like say a rocket launcher, you can simply declare a new RocketLauncher class that implements the useWeapon() method of the WeaponBehavior interface to launch a rocket. If you would like to add a new character say a team of elite jokers who terrorize everyone, you can simply add a class for their weapon and a class for their character and you are all done. You don’t have any need to touch any other piece of existing code. Also, now all your existing characters can use these new weapons and your new jokers can also use the previously existing weapons.

StrategyPattern

So the main aim is to separate the algorithms or varying behaviors from the clients that use it. The image above should make it clearer. You can also refer to this video by Derek Banas for more information.

I hope you understood the need for the knowledge of design patterns and the way the strategy pattern can be utilized. Have a great day developing code and always remember that more time is spent in maintaining and changing software than on initial development. So make it easier for your next incarnation to maintain and extend the code you write in this life.

Stay tuned for more design patterns 🙂